
One of my favourtie fall looks is definitely a contoured eye with winged liner along with a pinky nude lip! This is what this look is all about. The pale lip puts focus on the eyes and the long lashes are a must. So keep reading to find out what products I used to create this and how i applied them!

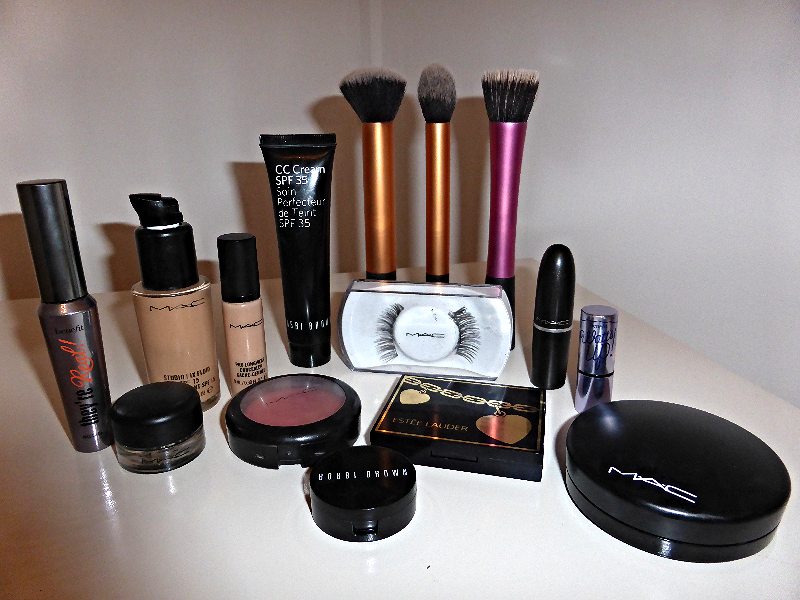

I started off with a fresh face and then primed with the Bobbi Brown CC cream in pale nude. I applied this all over my face. I then used my Bobbi Brown corrector in Light to Medium Bisque to cancel out the purple tones under my eyes. As I have mentioned before I have terrible dark under eye circles, so if you don’t have this problem you can probably skip this step. Next I used my MAC Studio Fix foundation in the shade NW25. Now, I have had a love hate relationship with this foundation as I find it has brilliant coverage but is very thick. Also you have to apply a few layers and it is already a very heavy consistency to begin with so it feels very cakey on my skin. So I’m still trying to figure this one out, but it looks good with this look. Any way, I applied this with my Real Techniques stippling brush. I am planning on doing a review on Real Techniques brushes this month, as they are my absolute favourite! Next comes concealer. For this look I used MAC’s Pro Longwear concealer in NW20, this concealer is amazing! It lasts all day (hence the name ‘pro longwear’) and acts as a highlighter as well. I applied this under my eyes in a triangle shape as this highlights the under eye area. I used the Real Techniques beauty blender sponge to apply this and blend it out.
For the contour I used MAC’s Mineralize Skinfinish powder in shade Medium Dark. I find that using a powder slightly darker than your skin tone is a lot more natural than using a bronzer. It takes some building up but if you have the time then this is defiantly the way to go about contouring them cheeks. So I applied this with the Real Techniques contour brush into the hollows of my cheeks and working that up to my temples and the edge of my forehead. Then I added a tiny bit down each side of my nose. I then applied Benefit’s What’s Up! highlighter to my cheek bones and gently blended this in using my fingers. For a slight blush I used MAC’s powder blush in the shade Fleur Power. I only added a tiny bit of this to the apples of my cheeks and worked it up towards my temples using a Dirty Works blusher brush. Now to make sure there are no harsh lines on my face make up I used Real Techniques Buffer brush to just blend it all out all over my face.
Time for my favourite part of make up, the eyes! I went back to my Pro Longwear concealer and dabbed this on my eyelids to prime them and help my eye shadow look bolder and stay put. I used my finger to apply this all over the lid. I then went to my Estee Lauder eye pallet and applied the shade 79 Summer Linen (MATTE) all over my lid as a base colour. I used the shade 47 Nude fresco (SATIN) on the inner half of my lid, blending it out towards the outer corner and not going above the crease. For the crease and outer corner I used 18 Sepia Sand (SATIN), I love this pale brown shimmery shade! I worked this into my crease and blended it down towards the outer corner. Finally I went to the shade 38 Chocolate Bliss (MATTE) and worked this into the outer corner, blending it up over and around the crease. I then took my Body Shop blending brush and gently blended it all together.
For eyeliner I used MAC’s fluid liner called Black track. I used my EcoTools angled liner brush to apply this. I started at the inner corner sweeping along the lid and then drawing a line from the edge of my lid upwards in line with the end of my eye brown and then drew another line to connect the line along my lid with the wing, creating a cat eye. Sounds confusing I know, I am going to do a whole post with pictures on how to master winged eyeliner shortly. Then I applied a single coat of Benefit’s They’re Real! mascara to my top and bottom lashes before putting on the false lashes. The lashes I used for this look are from MAC and are number A34. They are slightly longer at the ends and have a mixture of black and brown lashes. I then put a thin line of glue along my false lashes and waited around 30 seconds for the glue to become tacky and applied them to my eyes using tweezers. This can be so fiddly and just takes a lot of practice to apply them in the correct position on your eyes.
Finally the lipstick! For this look I used MAC’s lipstick BRAVE from the Satin collection. This lipstick featured in my September favourites post, as I am obsessed with it! It is so subtle and just suits any eye colour and eye make up.
I hope you get the chance to try the look out for yourself, even if you don’t have the products I use you could use any brown or neutral shades for the eye shadow to recreate this look and whichever foundation suits your skin best. I understand that there are a lot of MAC products that feature in this post as I had just had a huge MAC haul before deciding to create this look.
Thank you for reading!
Georgia May x


G bomb! You're stunning!! Xxx
ReplyDeleteThank you katie! You too! xxx
Delete